
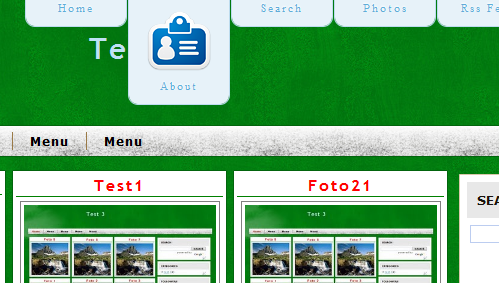
Add Beautiful Fixed Css/Jquery horizontal menu to your blog
1. Log in to your dashboard--> Design- -> Edit HTML
2. Click on "Expand Widget Templates"
3. Search "Ctrl+F" and find the following code: ]]></b:skin> and before it paste the next one:
/*----------------------------------------------------
{--------}  Menu {--------}
----------------------------------------------------*/
ul#navigation {
    position: fixed;
    margin: 0px;
    padding: 0px;
    top: 0px;
    right: 310px;
    list-style: none;
    z-index:999999;
    width:721px;
}
ul#navigation li {
    width: 103px;
    display:inline;
    float:left;
}
ul#navigation li a {
    display: block;
    float:left;
    margin-top: -2px;
    width: 100px;
    height: 25px;
    background-color:#E7F2F9;
    background-repeat:no-repeat;
    background-position:50% 10px;
    border:1px solid #BDDCEF;
    -moz-border-radius:0px 0px 10px 10px;
    -webkit-border-bottom-right-radius: 10px;
    -webkit-border-bottom-left-radius: 10px;
    -khtml-border-bottom-right-radius: 10px;
    -khtml-border-bottom-left-radius: 10px;
    text-decoration:none;
    text-align:center;
    padding-top:80px;
    opacity: 0.9;
    filter:progid:DXImageTransform.Microsoft.Alpha(opacity=90);
}
ul#navigation li a:hover{
     background-color:#CAE3F2;
}
ul#navigation li a span{
    letter-spacing:2px;
    font-size:11px;
    color:#60ACD8;
    text-shadow: 0 -1px 1px #fff;
}
ul#navigation .home a{
    background-image: url(http://img163.imageshack.us/img163/1473/homehc.png);
}
ul#navigation .about a      {
    background-image: url(http://img156.imageshack.us/img156/4176/idcardqx.png);
}
ul#navigation .search a      {
    background-image: url(http://img21.imageshack.us/img21/7365/searchl.png);
}
ul#navigation .podcasts a      {
    background-image: url(http://img834.imageshack.us/img834/8079/camerae.png);
}
ul#navigation .rssfeed a   {
    background-image: url(http://img263.imageshack.us/img263/5871/rssd.png);
}
ul#navigation .photos a     {
    background-image: url(http://img508.imageshack.us/img508/2226/ipodl.png);
}
ul#navigation .contact a    {
    background-image: url(http://img808.imageshack.us/img808/5498/mailos.png);
}
You can see in the upper code that exist a couple lines with some images (blue lines). Those images are for the image that will appear in the menu. When you will create another menu item you have to add your image like in those lines.
Exemple: For an Download menu item you must add this line:
ul#navigation .download a    {
    background-image: url(link to the image);
}
To align the menu left , right or center modify the : right: 310px; value.
4. Now find the </head> tag and before it paste the code:
<script src='http://descarca.googlecode.com/files/jquery.js' type='text/javascript'/>
<script type='text/javascript'>
$(function() {
var d=300;
$('#navigation a').each(function(){
$(this).stop().animate({
'marginTop':'-80px'
},d+=150);
});
$('#navigation > li').hover(
function () {
$('a',$(this)).stop().animate({
'marginTop':'-2px'
},200);
},
function () {
$('a',$(this)).stop().animate({
'marginTop':'-80px'
},200);
}
);
});
</script>
If you have Jquery instaled on your template delete the red line.
5. The next step is to find:
<div id='art-main'>    <b:section class='art-header' id='header' maxwidgets='1' showaddelement='no'>
<b:widget id='Header1' locked='true' title='Test 3 (Header)' type='Header'>
<b:includable id='title'>
... in your template the title of the header will be different.
Now paste the next code after <div id='art-main'>:
<ul id='navigation'>
            <li class='home'><a href=''><span>Home</span></a></li>
            <li class='about'><a href='http://www.artistutorials.co.cc'><span>About</span></a></li>
            <li class='search'><a href='http://www.artistutorials.co.cc'><span>Search</span></a></li>
            <li class='photos'><a href='http://www.artistutorials.co.cc'><span>Photos</span></a></li>
            <li class='rssfeed'><a href='http://www.artistutorials.co.cc'><span>Rss Feed</span></a></li>

            <li class='podcasts'><a href='http://www.artistutorials.co.cc'><span>Podcasts</span></a></li>
            <li class='contact'><a href='http://www.artistutorials.co.cc'><span>Contact</span></a></li>
        </ul>
You can see that each menu item has a class. This class is for display the image for the menu item (exemple how to add image is on the step 3). When you add a new menu item make sure that you add the class to display the image
So for a new menu item the code will be:
<li class='download'><a href='your link'><span>Download</span></a></li>Save the template and see the result.
Get Latest Updates For Free!


Subscribe via Email


13 comments
hello nice tutorial but i have a problem...
The "home" word and every word is out of menu item...
look here: http://teeeeesssssssssstttttt.blogspot.com/
i tried to change some values but i didn't have any result.
Also i copied the code from your demo blog but the same result, if you know what's going wrong please tell me...
Thanks
Remove all the:
<style type="text/css">
and
</style>
above ]]></b:skin>
i removed all...
but now is worst...
Send me your template.
i sent it. hope to receive it...
it's the template ftom http://teeeeesssssssssstttttt.blogspot.com/
thanks
Thank you It's working great for me.
now it's working.
i put the code from step3 and 4 before /head
and the links i put them after exactly div id='art-main' and it's working properly..
http://supercomments.blogspot.com
it's work. thanks> http://jejamuran-asj.blogspot.com
Can you give tutorial how to make bottom fix menu like in http://www.bhinneka.com Thx...
How align this menu to center? I've try to change "right: 310px;" by align: center but it doesn't work. Please help...
To align the menu to center change the value of right:310px with another value until the menu is align.
I've align to center in my computer (1366x768). but when i try to open with another resolution it can't center ??? Please help...
Sorry for the delay (was in a trip).About your problem, to align the menu in browser at middle change:
ul#navigation {
position: fixed;
margin: 0px;
padding: 0px;
top: 0px;
right: 310px;
list-style: none;
z-index:999999;
width:721px;
}
with
ul#navigation {
position: relative;
width:721px;
margin:0 auto;
z-index: 99999;
}
and change the width value with the width of your menu(very important for aligning the menu).
But by doing this changes your menu will not be fixed anymore, it will scroll with the whole page.
Click to Add a New Comment
Leave your comment
- If you're asking a question click the Subscribe By Email link, below the comment form, to be notified of replies.
- Do NOT add links to the body of your comment as they will not be published.
- Only the comments posted in ENGLISH will be approved.
- If you have a problem check first the comments , maybe you will find the solution there.